Wednesday, April 29, 2009
Monday, April 27, 2009
Wednesday, April 22, 2009
Abbey Thread Catcher
Here is the link to the thread catcher pattern...
http://abbeylanequilts.com/portfolio.html
You can see more on Abbey Lane Quilts blog here..
I love this pattern because you can use several coordinate fabrics.. I think these are going to make great Christmas gifts!
http://abbeylanequilts.com/portfolio.html
You can see more on Abbey Lane Quilts blog here..
I love this pattern because you can use several coordinate fabrics.. I think these are going to make great Christmas gifts!
Tuesday, April 21, 2009
Thread Catcher


This has got to be one of the cutest thread catchers I've seen! I bought this pattern several months back along with the fabric (Back Porch Bouquet by Maywood Studio). The thread catcher was very easy to put together. My sewing could have been so much better on this project. This pattern requires Alene's Tacky Glue. I'm not sure what other people's opinions are of the product, but I personally don't like using it for heavy duty things that are meant to be permanent. So for this project I used a liquid glaze product used in paper crafting. I swear the stuff works better than superglue!
You can view another thread catcher HERE
Sunday, April 19, 2009
Wednesday, April 15, 2009
Tragedy Strikes Close to Home

Our whole town is mourning the death of two teens killed last night. The accident happened less than 1/4 mile from my home on the train tracks. You can see the news story HERE. My son was friends with these kids. Our town is a very small town so all the kids here are pretty tight. Last night I heard the sounds of the train blaring--quite a bit more than usual, and even louder than normal. The kids were standing on the double-line railroad tracks on the northbound track. Apparently (according to the local kids) the they were waiting for the freight train heading south on the southbound tracks to go by and were watching the end of the train while waiting for it to go by.. They think they didn't hear the oncoming Amtrak train (going northbound) because the freight train was so loud. The Amtrak train blared his horns for a long time, and the teens did not move. It has just been a hard hit on this community. There are piles of flowers and balloons around their make-shift memorial. Tragedies like this never make sense.... My condolences go out to these families and friends.
Sunday, April 5, 2009
Back Porch quilt
Wednesday, April 1, 2009
Diagonal length from a square

To calculate the finished diagonal measurement of a block, multiply the finished size of the block by 1.414.
This was taken from the following site:
http://sentimentalstitches.net/instructions/diagonal-measurement-of-squares/
Tuesday, March 31, 2009
Quilt by Mom 6/2005
This is a quilt my mom made a few years back. She always has great taste in her color combinations. This one is one of my favorites....
Sunday, March 29, 2009
Monday, March 9, 2009
Sunday, March 8, 2009
Stuff to show off..
I have been finding more pics of quilts made in the past couple of years. Here are a few of them...
Tuesday, February 24, 2009
pattern links
- http://www.missrosiesquiltco.com/Whats_New.html
- http://sandihendersondesign.com/catalog.htm?item=7
- http://www.quiltingworks.com/patterns/free.htm
- http://heatherbailey.typepad.com/heather_bailey/2008/07/some-of-you-may.html
- http://www.bhg.com/crafts/sewing/accessories/patchwork-pincushion/
- http://craftgossip.com/blog/cupcake-pin-cushion-patterns/2008/11/01/
- http://www.quiltmaker.com/patterns/patt95/
- http://www.thecalicocat.com/patterns-pincushions.htm
- http://lovetocrochetandknit.blogspot.com/2006/07/flower-pin-cushion.html
- http://tipnut.com/wild-flower-pincushion-pattern/
- http://tipnut.com/22-free-pincushion-patterns/
Blogger issues
- http://thepatternbasket.blogspot.com/
- http://mousechirpy-polkadotpineapple.blogspot.com/
- http://happyinquilting.blogspot.com/
I wasn't able to add these to the sidebar for whatever reason. Blogger was being nit-picky tonite... so I'm posting links here...
Monday, February 16, 2009
Cider Mill Road Quilt
Saturday, January 31, 2009
How I plan a quilt square..


Well,I have tried many things including using Electric Quilt 5 programs to try to visualize what my quilt will look like. The program is so frustrating to me! I sat down and figured this out--and I really like it! I am a paper crafter as well as a quilter. I found this useful because you can create a grid without having to see the blue lines on a sheet of grid paper... If you look at the first picture, I took a blank sheet of cardstock and scored it every 1 inch--horizontally and vertically. Then I cut the paper down to 8 x 8 inches. I did this because the square I have planned out is a 16 x 16 inch square. I marked the pattern on the grid with a marker to bring out he pattern. What I particularly like about doing this is that you can see the squares and you can see the pattern without having to visualize those blue lines... Also with this you can flip it over and use the other side for another block.
Sunday, January 4, 2009
Finished UFO


Well it's not a quilt but it's been sitting around for a little while--unfinished.. This is a potholder I made. My plan is to have enough next year to send out with all of my Christmas goodies. I think this one took me about 3 hours from start to finish, including cutting the fabric (estimated). For this project I purchased batting that has a mylar sheet pressed into the middle. The mylar sheet is padded by warm n' natural. They really were easy to make! And I was surprised at how quickly they went together.
Wednesday, December 31, 2008
My Bear Quilt


I love bears!! I also love woodsy type stuff.. so naturally I fell in love with this pattern by Debbie Fields. Out of all the quilts I have made this one has taken me the longest. I spent 4 months on this one. It took a while because of the detail of the applique and the satin stitching around the edges. This one was a queen size quilt...The blocks are 16 inches and sitting on-point. I did not take a picture of it finished, but you get the idea! It is quilted and being used on my log bed... I also made a table runner to match that was quilted on my table-top machine...

Up close you can see the bear paw and the bear quilted into the runner...
Sunday, December 28, 2008
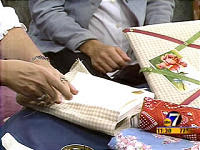
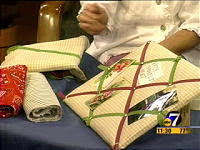
fabric memory board


The concept for this pin-free bulletin board dates back to the 18th Century; examples are seen in paintings from that time. More recently, you have seen them offered in trendy home furnishings catalogues and stores.
While the idea of using a lattice of ribbons on a board to display snap shots and other ephemera originated well before the invention of the thumbtack and pushpin, this application is timeless.
Hundreds of years ago, papers were precious and the ribbon board was one way to keep them safe. Now, although paper is plentiful, there are some paper items we cherish and want to display, preferably without poking holes through them. So, once again, "everything old is new."
While early ribbon boards were made by simply stretching ribbons across a piece of wood, today's versions are fancier to look at and easier to construct. One of the great things about this project is that it can be as feminine or as funky, as masculine or as mod, as you wish.
The first thing to decide, then, is where you will hang your ribbon board. Choose fabric and ribbon to coordinate with that room's decor. If the ribbon board is a gift, think about the recipient's hobbies or interests.
While the idea of using a lattice of ribbons on a board to display snap shots and other ephemera originated well before the invention of the thumbtack and pushpin, this application is timeless.
Hundreds of years ago, papers were precious and the ribbon board was one way to keep them safe. Now, although paper is plentiful, there are some paper items we cherish and want to display, preferably without poking holes through them. So, once again, "everything old is new."
While early ribbon boards were made by simply stretching ribbons across a piece of wood, today's versions are fancier to look at and easier to construct. One of the great things about this project is that it can be as feminine or as funky, as masculine or as mod, as you wish.
The first thing to decide, then, is where you will hang your ribbon board. Choose fabric and ribbon to coordinate with that room's decor. If the ribbon board is a gift, think about the recipient's hobbies or interests.
MATERIALS:
1 piece of 3/16" foam core board, 15" X 20"
1 piece of fabric, 20" X 24" for front covering
1 piece of fabric, 15" X 20" for back covering
9 feet or more ribbons
1 piece of 1/2" quilt batting, 15" X 20"
1 package brass 1" paper fasteners
Double-sided tape
TOOLS AND SUPPLIES:
Scissors
Stapler
Ruler
Hammer
Big nail
Small hole punch
Thin wire for hanging
Xacto knife
STEPS:
To begin, determine the size you want your memory board to be. Ours is made from one half of a standard sheet of foam core board, which leaves the other half to make another board. But perhaps you would like a tall thin one to fit that narrow space by the door. Make yours any size you wish.
Lay the larger piece of fabric wrong side up on your work surface.
Place the piece of batting in the center of the fabric. No need to measure -- just leave a border of fabric all around the batting.
Place the foam core board on top of the batting.
Next, attach the fabric to the back of the foam core using double sided tape. Run a strip of the tape along all 4 sides of the back of the board. Pull the fabric snug over one of the long sides, secure on tape in the center of that side. Pull fabric snug on opposite side, secure in the center of that side. Do the same on the two short sides.
To finish securing fabric to board, continue stretching and securing from the center out every couple of inches on opposite sides, taking care to make corners tidy and square.
With board still wrong side up, use a marker to mark every five inches about 1" in from the edge of board on all four sides. These marks will show you where to attach your ribbons.
To add brass buttons and further secure ribbons, place your covered foam core board right side up on a thick layer of magazines. Where 2 ribbons cross, use hammer and large nail to punch hole through ribbons, all the way through board.
Place paper fasteners through all holes, open and secure on backside.
To finish, use open stapler to attach small piece of fabric to back of board. Then stretch piece of thin wire across back of board. Poke ends through fabric on back edge about 5" down from top. Twist ends to secure. This forms the hanger.
This tutorial was taken from: http://www.thedenverchannel.com/news/1642086/detail.html
Friday, December 26, 2008
Blue and green pinwheel


This is one of the quilts I put in the Clark County Fair here in WA this year. I won a blue ribbon on it. When I made this I made two of them. One for myself and one for one of my best friends. I found the fabric for the sashing and fell in love with it. It's very old-fashioned. But the color combo was so neat!
Subscribe to:
Posts (Atom)


This is a quilt my aunt made and entered into the Oregon State Fair. She won a red ribbon. I'm not positive, but I believe this quilt above is hers also...


